


LAVASH CRACKER
Recipe Reference: The Bread Baker's Apprentice: Mastering The Art of Extraordinary Bread, by Peter Reinhart. Ten Speed Press, Berkeley, CA. Copyright 2001. ISBN-10: 1-58008-268-8, ISBN-13: 978-158008-268-6.
Here's a simple formula for making snappy Armenian-style crackers, perfect for breadbaskets, company and kids...
It is similar to the many other Middle Eastern and Northern African flatbreads known by different names, such as mankoush or mannaeesh (Lebanese), barbari (Iranian), khoubiz or khobz (Arabian), aiysh (Egyptian), kesret and mella (Tunisian), pide or pita (Turkish), and pideh (Armenian).
The main difference between these breads is either how thick or thin the dough is rolled out, or the type of oven in which they are baked (or on which they are baked, as many of these breads are cooked on stones or red-hot pans with a convex surface)...
The key to a crisp lavash,...is to roll out the dough paper-thin.
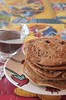
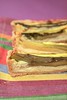
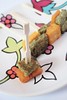
The sheet can be cut into crackers in advance or snapped into shards after baking. The shards make a nice presentation when arranged in baskets.
Makes 1 sheet pan of crackers*
1 1/2 cups (6.75 oz) unbleached bread flour or gluten free flour blend (If you use a blend without xanthan gum, add 1 tsp xanthan or guar gum to the recipe)
* 1/2 tsp (.13 oz) salt
* 1/2 tsp (.055 oz) instant yeast
* 1 Tb (.75 oz) agave syrup or sugar
* 1 Tb (.5 oz) vegetable oil
* 1/3 to 1/2 cup + 2 Tb (3 to 4 oz) water, at room temperature
* Poppy seeds, sesame seeds, paprika, cumin seeds, caraway seeds, or kosher salt for toppings
1. In a mixing bowl, stir together the flour, salt yeast, agave, oil, and just enough water to bring everything together into a ball. You may not need the full 1/2 cup + 2 Tb of water, but be prepared to use it all if needed.
2. For Non Gluten Free Cracker Dough:
Sprinkle some flour on the counter and transfer the dough to the counter. Knead for about 10 minutes, or until the ingredients are evenly distributed. The dough should pass the windowpane test (see http://www.wikihow.com/Determine-if-Bre … ong-Enough for a discription of this) and register 77 degrees to 81 degrees Fahrenheit.
The dough should be firmer than French bread dough, but not quite as firm as bagel dough (what I call medium-firm dough), satiny to the touch, not tacky, and supple enough to stretch when pulled.
Lightly oil a bowl and transfer the dough to the bowl, rolling it around to coat it with oil. Cover the bowl with plastic wrap.
or2. For Gluten Free Cracker Dough:
The dough should be firmer than French bread dough, but not quite as firm as bagel dough (what I call medium-firm dough), and slightly tacky.
Lightly oil a bowl and transfer the dough to the bowl, rolling it around to coat it with oil.
Cover the bowl with plastic wrap.3. Ferment at room temperature for 90 minutes, or until the dough doubles in size. (You can also retard the dough overnight in the refrigerator immediately after kneading or mixing).
4. For Non Gluten Free Cracker Dough:
Mist the counter lightly with spray oil and transfer the dough to the counter.
Press the dough into a square with your hand and dust the top of the dough lightly with flour. Roll it out with a rolling pin into a paper thin sheet about 15 inches by 12 inches.
You may have to stop from time to time so that the gluten can relax.
At these times, lift the dough from the counter and wave it a little, and then lay it back down. Cover it with a towel or plastic wrap while it relaxes.
When it is the desired thinness, let the dough relax for 5 minutes.
Line a sheet pan with baking parchment.
Carefully lift the sheet of dough and lay it on the parchment.
If it overlaps the edge of the pan, snip off the excess with scissors.
or4. For Gluten Free Cracker Dough:
Lay out two sheets of parchment paper.
Divide the cracker dough in half and then sandwich the dough between the two sheets of parchment.
Roll out the dough until it is a paper thin sheet about 15 inches by 12 inches.
Slowly peel away the top layer of parchment paper.
Then set the bottom layer of parchment paper with the cracker dough on it onto a baking sheet.
5. Preheat the oven to 350 degrees Fahrenheit with the oven rack on the middle shelf.
Mist the top of the dough with water and sprinkle a covering of seeds or spices on the dough (such as alternating rows of poppy seeds, sesame seeds, paprika, cumin seeds, caraway seeds, kosher or pretzel salt, etc.) Be careful with spices and salt - a little goes a long way.
If you want to precut the cracker, use a pizza cutter (rolling blade) and cut diamonds or rectangles in the dough.
You do not need to separate the pieces, as they will snap apart after baking.
If you want to make shards, bake the sheet of dough without cutting it first.
5. Bake for 15 to 20 minutes, or until the crackers begin to brown evenly across the top (the time will depend on how thinly and evenly you rolled the dough).
6. When the crackers are baked, remove the pan from the oven and let them cool in the pan for about 10 minutes.
You can then snap them apart or snap off shards and serve.
MY TWO CENTS
As non celiac I was very worried about making a dough with a gluten free flour mix, that was a little bit expensive too.
For 1 kg I've payed almost 7 euro!!!
I didn't find the gum and this improved my concerns.
Last but not least here we have istant yeast and fresh yeast being not so confident with the istant one I've prefered use the fresh one adapting the dose to my experience.
What a big mistake!
I've not thought about the gluten free flour so the dough punished me and it didn't arise althought I've waiting for it for almost 3 hours.
Ok, I'm KO!
But I've lost the battle not the war! and I'm a warrior....
Soooo...did you read????
The key to a crisp lavash,...is to roll out the dough paper-thin.
But...where damn is my rolling-pin???
It doesn't matter :D
May I introduce you one of the best white wine from my region?
The sicily.

This is the best I achieved from my dough but...it won't be enough unfortunately.

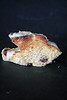
I have to thank for the rest of my life the DB challenge, those are my findings simply open my kitchen cupboard.
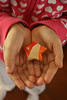
jars and jars of spices and herbes
Some of them lost there 3 years ago!!!
Since my house moving...what a shame.

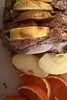
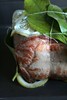
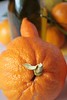
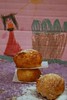
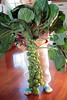
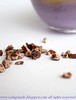
And I'm proud to my fresh herbs too.
In this shot I'm showing you sage, rosemary and marjoram


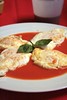
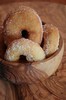
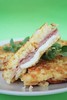
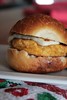
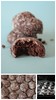
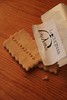
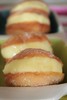
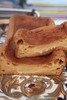
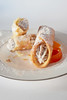
my crackers didn't arise even in the oven and had a beautiful bronish color so I was a little be more hopeful and wait till they were slightly warm to break into the double circle.
It works perfectly as you know!
And the smell has called my children going around the oven like little sharks.

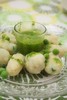
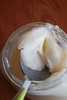
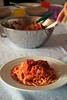
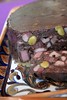
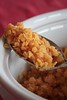
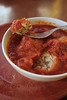
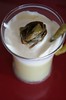
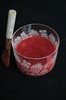
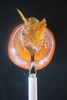
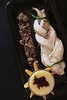
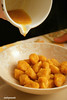
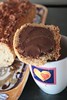
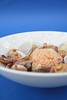
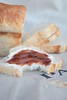
As dip I've used two vegetable preserves.
One of sweet peppers yellow and red in colours and a red onion preserve dressed up with some drops of balsamic vinegar and made more tasty using the salt you've see above one of the best culinary gift I've ever received.
During this passionate year in my kitchen I experimented some tips making preserves, all kind of preserves.
It is mandatory they have a brief boiling and rest over night.
This help to tasty the sugar and melt all the flavours.
On the next day you can cook your preserve and put into sterilized jar or use fresh as dips.
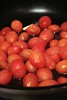
For the peppers I've sliced finely the peppers washed and dried.
Put in a deep pan toghether with a red hot chilli peppers of more if you like, two tbs of white vinegar and the half in amount of sugar and put on the flame for a brief boil.
Rest for overnight and then boil to thickness, put in sterilized jar.
Usually I use this preserve with tasty cheese or bolied meat (but never say this to a veggie!)
The red onion preserve.
Put the sliced red onion in a deep pan toghether with a laurel leaf, two tbs of white vinegar or balsamic one as I made, half in amount of sugar and some pepper.
As I use this as dip I've add some salt fumeè.

the result?
A wonderful taste but hard like a stone.
Please someone call my dentist!
Anyway I'm convinced that something worked wrong so I'm going to test it again using both flours and roll my dough thinner.
I must thanks Shellyfish and Natalie our host for this month.
Don't forget to take a look of the other wonderful creations on DB Blogroll on my sidebar.
We are many people but we are funny and all of us has felt in love with this great idea of DB challenge.
Looking forward next challenge.
Enza

21 commenti:
You did a great job! Those crackers look beautiful! A wonderful way of flavoring them and what delicious preserves! Yummy!
Cheers,
Rosa
Nice pics - Great idea to use a wine bottle as a rolling pin!
Bellissime foto davvero, ed è grandiosa la tua capacità di arrangiarsi! Grande Enza!!! Li ho fatti anche io ma in versione normale, senza eccedere in spese davvero esorbitanti per la farina! Elga
Wow you did the Gluten Free version, chapeau!
Yes, gluten free flour is incredibly expensive - I usually mix up my own. The recipe needed more water to rise. My first batch could have been used as plates!
Great job fellow DB :-) You were very creative for the shape of your crackers, they're really cute.
Cute crackers!
congratulations on an excellent job well done. love your pictures!
Enza,
I am going to make it again, and this time I'll copy your round cute crackers (provided that you allow me, off course)Love the dips, love the photos, love the herbs, and I also love your rolling pin (LOL).....
Well done, Enza!
Ehi ciao!!!
Proprio simpatica la tua avventura con questi crackers, ma hai visto quanto son buoni?
La prossima volta che li faccio ci metto anch'io tutte le erbette!
Ottimo lavoro!
Un abbraccio
Ago :-D
Pane, burro e marmellata!
it took me a while to get the right consistency too. mine were also very hard at first. gluten free baking is trickier than it seems right? but they look great enza!
Ooo, your lavash looks amazing! Good job trying it gluten free, it just takes some getting used to, to get right!
Sono spiacente che il vostro lavash non è risultato correttamente. Ciò era una sfida ingannevole. I "dips" sembrano squisiti, tuttavia. Spero che possiate capire queste parole.
it doesn't look that hard ! Maybe you baked it a little too much ?
Your dipping sauces are terribly yummy !!!!!
Mi danno idea di una leggerezza folle! Sbaglio?
Appena ho tempo mi metto li e leggo tutta la ricettina... mi ispirano moltissimo!
Un super abbraccio..
Sere
I love the way your lavash turned out. It's so pretty in the stamped rounds. I had quite a time with the fresh vs instant vs active dry too. I couldn't find fresh at all and the being use to active dry I dumped the instant yeast into water and then added salt nearly killing it. I am so glad to hear that I wasn't the only one to have yeast trouble.
Ma sei bravissimaaaaaaa!
Grande mamma enza, da provare..tanto il dentista é a casa con me.. :)))
Un abbraccio e ancora brava brava, bel lavoro!
Very nice job! I like the circles in your crackers, and your preserves look delicious
I was late posting --I thought it had to go up the 30th!
Pat in NY
Love the wine bottle ;)
Enza, sei forte! Great post and great job on the crackers (sorry about your teeth!)
What a pity they were too hard on the teeth, because they look so darn gorgeous! Love the way you shaped the lavash.
Posta un commento