lunedì 15 giugno 2009

la patata, ci va la patata


Così diceva la mamma di Antonella la mia compagna di stanza.
La ragazza con la quale ho condiviso tutto per cinque anni compresi i 20 mq della nostra stanza al collegio universitario.
Eh si, è duro essere studenti fuori sede ma le amicizie fatte durante quegli anni sono diventate indissolubili anche se la vita ci ha portato lontano.
E le giornate erano scandite al ritmo dello studio, sotto esame non volava una mosca per i corridoi, erano pianti, gioia per l'esamone superato.

Erano momenti di vita condivisi tutti insieme, erano liti e riappacificazioni.
Ed erano pacchi e borsoni pieni di ogni ben di dio che viaggiavano su e giù per l'Italia dalla sicilia, dalla puglia, dalla calabria, dalla campania e anche dal piemonte.
Antonella, la mia compagna di stanza viene dalla provincia di bari, da Conversano paese che porta nel cuore e nel suo borsone, rigorosamente ritirato da Francesco alla caserma dei carabinieri di viale delle Milizie non poteva mancare un bel pezzo di focaccia.
Il segreto? La patata.
Sono anni che cerco di rifarla tal quale.

In rete troverete tantissime ricette ma quel sapore, quel particolare sapore l'ho ritrovato soltanto rifacendo (a modo mio, come al solito) la ricetta di Palma D'onofrio e sapete perchè? La signora ci mette la patata :)
200 g di farina 00
100 g di farina di semola
250 g di patate lesse
8 gr lievito di birra
200 g di acqua tiepida
50 g di olio extra vergine di oliva
1 pizzico di zucchero
10 gr di sale

Per condire
20 pomodorini
olio
sale
uno spicchio di aglio spremuto con lo spremiaglio
origano secco

Io uso per gli impasti sempre lo stesso metodo, faccio un polish con il lievito l'acqua lo zucchero e un paio di pugni della miscela di farina e lascio riposare per circa 25 minuti.
Nel frattempo lesso le patate e le schiaccio ancora bollenti nella rimanente farina mescolo bene in modo da far perdere calore.
Verso il polish e lavoro bene bene ottenendo un impasto abbastanza sostenuto che poi verrà ammorbidito con l'olio.
Per mia abitudine aggiungo sia i grassi che il sale per ultimi per non ostacolare la lievitazione.
Il polish inoltre mi permette di abbassare la quantità di lievito impiegata.
L'impasto finale, proprio come dice la signora D'Onofrio deve essere morbido ma sostenuto.
Io lo lascio leggermente appiccicoso a differenza della ricetta originale.
Lo lascio lievitare fino al raddoppio e nel frattempo taglio a metà i pomodorini e li condisco con olio sale aglio e origano lasciandoli insaporire per almeno mezz'ora.
Quando l'impasto è ben lievitato lo verso direttamente nella teglia oliata (questo impasto va bene per una teglia da 26 cm) e lo stendo con le mani unte lasciandolo un pò altino, distribuisco i pomodorini e anzichè cospargere la superficie di acqua olio e sale uso il liquido dei pomodori per umidificare la superficie.
Lascio riposare ancora una ventina di minuti e inforno a 220°C.
E' lei, lo giuro, è quella del mio periodo universitario.

mercoledì 10 giugno 2009

il capanno degli attrezzi

Si si lo so il titolo c'entra poco con quel che vedete.
O meglio c'entra più di quel che si pensi.
Primo perchè chi si occupa di cucina per hobby o per lavoro sa benissimo quanto fondamentale sia l'attrezzatura.
Che sia un coppapasta diametro 7 o uno stampo da cioccolata o quella teglia particolare o la punta con lo smeriglio a fiore per le torte decorate.
Chi di noi a Roma non è rimasto incantato da Peroni o da Kitchen?

Alzi la mano e scagli la prima pietra.
Beh rispetto ai miei primi passi in cucina più o meno 30 anni fa moltissime cose sono cambiate.
Le nostre cucine sono piene di attrezzi per lo più ingombranti, specie se non hai una cucina da 100 mq con tanto di ponte levatoio (vero Giu e Cat?).
Se poi il tuo capanno degli attrezzi è davvero una tiny kitchen come la mia da nemmeno 2 mq allora diventa mandatorio avere qualcosa che si possa piegare e riporre in pochissimo spazio.

Ecco lo sapevo ci siete arrivati.
Il silicone o meglio, visto che la qualità in questo campo è assolutamente fondamentale, il silicone Silikomart.
Anche io ci sono cascata dopo anni e anni di snobbismo immotivato ed eccomi qua.
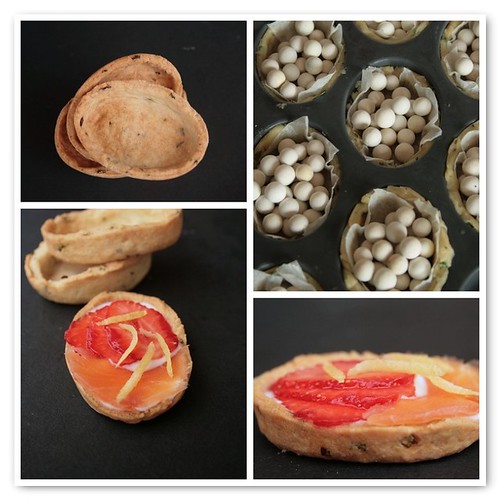
Barchette facili da fare e belle da vedere specie su un buffet.

Barchette yogurt trota affumicata e fragole

Per la pasta
- 200 gr di farina 00
- 80 gr di burro freddo
- erbe miste tritate in questo caso erba cipollina, erba aglina e maggiorana
- sale
- acqua frizzante fredda

Mescolare con la lama di un coltello il burro con la farina, il sale e le erbette fresche fino ad ottenere delle grosse briciole.
Aggiungere acqua frizzante quanto basta ad ottenere una pasta elastica da lavorare velocemente con la punta delle dita.
Fare una palla, avvolgerla nella pellicola e metterla a riposare in frigorifero per almeno 1 ora.

Stendere la pasta allo spessore di circa 2-3 mm e metterla negli stampi a barchetta Silikomart, bucherellare con una forchetta in modo che non gonfi in cottura e coprirla con carta da forno bagnata.
Poggiare sopra i pesini di ceramica per la cottura in bianco, in alternativa vanno benissimo i fagioli secchi e cuocere in forno a 220° fino a doratura.

Lasciar raffreddare poi riempire con yogurt naturale, fragole a lamelle, un pezzetto di trota affumicata e zeste di scorza di limone.

Non l'ho fatto, ma secondo me una spolveratina di pepe ci starebbe da dio.

sabato 6 giugno 2009

giocare a shangai


Era uno dei miei giochi preferiti da bambina specie in inverno nei noiosissimi e piovosi pomeriggi domenicali.
E mi è tornato alla mente proprio adesso.
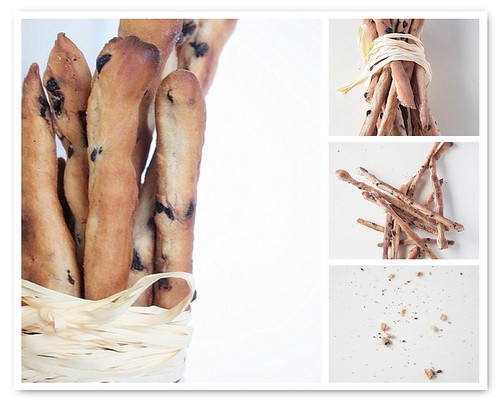
L'occasione è stata il post di Paoletta sui grissini alle gocce di cioccolato a loro volta rimbalzati da Coquinaria.
Mi ha incuriosito, attratta e soprattutto colta in un momento di noia.
Uno di quei momenti in cui fremi per trovare qualcosa di interessante da fare, che ti occupi e che ti svuoti il più possibile la mente (non che io ce l'abbia tanto occupata...la mente intendo!).
Insomma se avete i 5 minuti di frenesia da inattività allora questi fanno al caso vostro.
Specie se poi si gioca a serpentelli con le bambine sempre utile per calmare i bollenti spiriti e sedare la lite a tre per la stessa bambola.
Dai serpentelli siamo passati alla gioielleria con improbabili collane, braccialetti e anelli ma poco importa almeno ci siamo divertite.

Che c'entra lo shangai? Provate a farli, poi invitate un paio di amici e provate a giocarci a shangai.
Non ci credete? Questo è il risultato.

La ricetta la copio pari pari non senza invitarvi a fare una visitina alle fonti citate (per i pochi che ancora on conoscono nè il forum di Coquinaria Anice e Cannella il blog di Paoletta).
Ribadisco quanto già scritto da Paoletta, io ne ho fatta metà dose.
Decisamente tanti, non che ci si lamenti e confermo inoltre che sono assolutamente croccantissimi anche il secondo giorno.
Il terzo deve ancora arrivare ma dubito che i grissini ci saranno ancora.
GRISSINI AL CIOCCOLATO

Ingredienti:
Farina 0 1 kg
sale gr. 20
acqua l 0.45
strutto gr.40
malto 1 cucchiaio
lievito gr.30 (a seconda della fretta e delle condizioni atmosferiche, ecc. aumentare o diminuire)cioccolato gr.300 (in pastigliette piccole)

Procedimento:

Nell'impastatrice mettere tutti gli ingredienti tranne il lievito e la cioccolata.
Dopo 7 minuti aggiungere il lievito e quindi la cioccolata.
Impastare 15 minuti in totale, gli ultimi 3,5' a velocità più alta.
Fare un filoncino, riposo 30'- 40' coperto.
Tagliare a pezzettini, allungare con le mani, riposo 20'.
In forno a 230° circa 10'.
Controllare la cottura (il colore scuro puo' trarre in inganno) dato il colore che in partenza è gia' scurino si corre il rischio di bruciarli, quindi consiglierei di tenerli d'occhio le prime volte.

giovedì 4 giugno 2009

comida de mama e i compleanni in tour


Buon compleanno Comida!
Di solito le ricorrenze mi imbarazza non so mai da dove cominciare che cosa dire di cosa ringraziare.
Se è un'amica allora l'imbarazzo è doppio perchè in questo caso il compleanno di Elena è on tour (alex, annalibera e tanti altri...)
E non è un caso che sia on tour.
Perchè ognuno di noi ha di lei un concetto speciale perchè lei ti rende speciale ogni volta.
Ecco divento come Mammolo dei sette nani e mi mancano le parole.
Comida ha tante sfaccettature una più bella intelligente e divertente delle altre...(il post sulla pedicure è da sbattersi per terra)

Le ammiro tanto le amicizie intercontinentali che è riuscita a fare in questi anni, cosa così difficile qui in Italia e chissàcomemai...una tra tutte l'amicizia con Priya e proprio su una ricetta-non-ricetta di Priya è caduta la mia scelta.
E anche sul suo tag ComidadeMama per i bambini

Le nostre telefonate chilometriche partono puntualmente a valanga e mi lasciano allegra per tutto il giorno.
Come quella volta che tornai dal lavoro e aveva chiamato da Boston...e per trovarmi aveva spulciato i proietti dell'elenco telefonico di roma con risultati...da sbattersi per terra.
Beh detto questo...Buon Compleanno Comida de Mama

sabato 30 maggio 2009

qualcosa di associato e profumato


Non capita spesso di poter avere dei frutti belli profumati, di provenienza certa.
E ancor meno capita di aver tra le mani fragole come queste.
Un profumo che ricorda l'infanzia, dolci dolcissime quasi da esser tentati di non mettere zucchero.
Son passati almeno due anni dall'ultima volta che la mia cucina ha ospitato frutta così.
Frutta degna di esser messa sottovetro.
Proprio come sottovetro è la raccolta concorso di Virginia
Arrivo sul filo di lana come al solito, ma arrivo.
L'idea di usare il caffè per profumarne una e il basilico per l'altra non è mia ma di Sara di qualcosa di rosso, non avevo certo dimenticato l'associazione fragole\caffè proposta tempo fa per un risotto e per una raccolta che merita di essere ricordata
In realtà la mia labile memoria mi ha detto che da qualche parte qualcuno ha anche parlato di fragole e basilico.
alla faccia del food pairing.
Ora secondo me questo qualcuno è Elena di Comida de Mama ma potrei tranquillamente sbagliarmi.
detto questo due parole voglio spenderle sulla tecnica.
Eh si perchè fare le marmellate o le conserve non è cosa facile.
Devo dire che per molti di noi il libro di Christine Ferber è stato illuminante.
La tecnica bene o male è sempre la stessa.
La frutta va fatta macerare una notte mescolata allo zucchero e quasi sempre al succo di un limone.
Va poi cotta per dieci minuti a fuoco vivo e lasciata riposare di nuovo.
Il terzo giorno si prepara la marmellata.
E così ho fatto io (più o meno) aggiungendo un pò di purea di mele...oh insomma ecco la mia versione.
- 700 gr di fragole pulite
- 400 gr di zucchero semolato
- il succo di un limone
- succo e purea di una mela
Per il succo e la purea di mela basta tagliare una mela Bio in pezzi grossolani, lasciando sia la buccia che i semi, metterla in una pentola e coprirla a filo di acqua.
Cuocerla fino a che non sia tenera, quasi disfatta.
Colare il succo con un colino e passare la mela al setaccio.
Le fragole le ho lavate, asciugate e tagliate a pezzi, mescolate allo zucchero e al succo di limone in un tegame basso e largo (in questo modo in fase di cottura l'acqua contenuta nella frutta evaporerà prima accorciando i tempi di cottura).
Coperto e lasciato a macerare in frigo per una notte.
L'indomani ho portato a bollore vivace la frutta per circa 10 minuti, fatto raffreddare e riposto ancora una notte in frigorifero.
Il terzo giorno ho aggiunto il purè e il succo di mela (la mela serve ad aggiungere la pectina) e mixato con il frullatore ad immersione non troppo in modo da lasciare qualche pezzetto di fragola.
Portato ancora a bollore fino alla consistenza giusta e invasato.
Nella versione caffè la polvere l'ho messa in fondo al barattolo prima di versarvi la marmellata per poi mettere nella restante marmellata le foglie di basilico (del mio vasortello) lavate e asciugate.
Due accorgimenti.
Il primo: Lasciate la marmellata appena più liquida di quanto desideriate. Raffreddandosi e cristallizzandosi lo zucchero assumerà la giusta consistenza, altrimenti rischiate che diventi troppo dura.
Il secondo: io personalmente sterilizzo i barattoli in forno (ache i coperchi) a circa 130° C per circa 20 minuti. Invaso la marmellata bollente nei barattoli bollenti capovolgendoli subito.
e con questo eccomi anche io alla raccolta di Virginia


Logo concorso

mercoledì 27 maggio 2009

May DB challenge. Disaster in strudel shape!


The May Daring Bakers’ challenge was hosted by Linda of make life sweeter! and Courtney of Coco Cooks. They chose Apple Strudel from the recipe book Kaffeehaus: Exquisite Desserts from the Classic Cafés of Vienna, Budapest and Prague by Rick Rodgers.
APPLE STRUDEL
Preparation timeTotal: 2 hours 15 minutes – 3 hours 30 minutes

15-20 min to make dough
30-90 min to let dough rest/to prepare the filling
20-30 min to roll out and stretch dough
10 min to fill and roll dough
30 min to bake
30 min to cool

Apple strudelfrom “Kaffeehaus – Exquisite Desserts from the Classic Cafés of Vienna, Budapest and Prague” by Rick Rodgers

2 tablespoons (30 ml) golden rum
3 tablespoons (45 ml) raisins
1/4 teaspoon ground cinnamon
1/3 cup plus 1 tablespoon (80 g) sugar
1/2 cup (1 stick / 115 g) unsalted butter, melted, divided
1 1/2 cups (350 ml) fresh bread crumbs
strudel dough (recipe below)
1/2 cup (120 ml, about 60 g) coarsely chopped walnuts
2 pounds (900 g) tart cooking apples, peeled, cored and cut into ¼ inch-thick slices (use apples that hold their shape during baking)

1. Mix the rum and raisins in a bowl. Mix the cinnamon and sugar in another bowl.
2. Heat 3 tablespoons of the butter in a large skillet over medium-high. Add the breadcrumbs and cook whilst stirring until golden and toasted. This will take about 3 minutes. Let it cool completely.
3. Put the rack in the upper third of the oven and preheat the oven to 400°F (200°C). Line a large baking sheet with baking paper (parchment paper). Make the strudel dough as described below. Spread about 3 tablespoons of the remaining melted butter over the dough using your hands (a bristle brush could tear the dough, you could use a special feather pastry brush instead of your hands). Sprinkle the buttered dough with the bread crumbs. Spread the walnuts about 3 inches (8 cm) from the short edge of the dough in a 6-inch-(15cm)-wide strip. Mix the apples with the raisins (including the rum), and the cinnamon sugar. Spread the mixture over the walnuts.
4. Fold the short end of the dough onto the filling. Lift the tablecloth at the short end of the dough so that the strudel rolls onto itself. Transfer the strudel to the prepared baking sheet by lifting it. Curve it into a horseshoe to fit. Tuck the ends under the strudel. Brush the top with the remaining melted butter.
5. Bake the strudel for about 30 minutes or until it is deep golden brown. Cool for at least 30 minutes before slicing. Use a serrated knife and serve either warm or at room temperature. It is best on the day it is baked.

Strudel doughfrom “Kaffeehaus – Exquisite Desserts from the Classic Cafés of Vienna, Budapest and Prague” by Rick Rodgers

1 1/3 cups (200 g) unbleached flour
1/8 teaspoon salt
7 tablespoons (105 ml) water, plus more if needed
2 tablespoons (30 ml) vegetable oil, plus additional for coating the dough
1/2 teaspoon cider vinegar

1. Combine the flour and salt in a stand-mixer fitted with the paddle attachment. Mix the water, oil and vinegar in a measuring cup. Add the water/oil mixture to the flour with the mixer on low speed. You will get a soft dough. Make sure it is not too dry, add a little more water if necessary.Take the dough out of the mixer. Change to the dough hook. Put the dough ball back in the mixer. Let the dough knead on medium until you get a soft dough ball with a somewhat rough surface.
2. Take the dough out of the mixer and continue kneading by hand on an unfloured work surface. Knead for about 2 minutes. Pick up the dough and throw it down hard onto your working surface occasionally.Shape the dough into a ball and transfer it to a plate. Oil the top of the dough ball lightly. Cover the ball tightly with plastic wrap. Allow to stand for 30-90 minutes (longer is better).
3. It would be best if you have a work area that you can walk around on all sides like a 36 inch (90 cm) round table or a work surface of 23 x 38 inches (60 x 100 cm). Cover your working area with table cloth, dust it with flour and rub it into the fabric. Put your dough ball in the middle and roll it out as much as you can.Pick the dough up by holding it by an edge. This way the weight of the dough and gravity can help stretching it as it hangs. Using the back of your hands to gently stretch and pull the dough. You can use your forearms to support it.
4. The dough will become too large to hold. Put it on your work surface. Leave the thicker edge of the dough to hang over the edge of the table. Place your hands underneath the dough and stretch and pull the dough thinner using the backs of your hands. Stretch and pull the dough until it's about 2 feet (60 cm) wide and 3 feet (90 cm) long, it will be tissue-thin by this time. Cut away the thick dough around the edges with scissors. The dough is now ready to be filled.
Tips-
Ingredients are cheap so we would recommend making a double batch of the dough, that way you can practice the pulling and stretching of the dough with the first batch and if it doesn't come out like it should you can use the second batch to give it another try;
-The tablecloth can be cotton or polyster;
- Before pulling and stretching the dough, remove your jewelry from hands and wrists, and wear short-sleeves;
- To make it easier to pull the dough, you can use your hip to secure the dough against the edge of the table;
- Few small holes in the dough is not a problem as the dough will be rolled, making (most of) the holes invisible.

Both Courtney and I did a trial run on making the strudel.
Below are our notes:

Courtney's notes
- She could't get it to stretch to 2 feet by 3 feet, it turned out more like 2 feet by 2 feet. But the dough was tissue thin nevertheless;
- She got some serious holes, but after rolling it wasn't noticeable;
- She used a large cheese cloth which helped manipulate and stretch the dough more than a heavier cloth would have.

My notes
- I made the dough by hand, just mixed the wet ingredients into the dry ingredients with a wooden spoon. Kneaded it for about 5 min like you would bread dough. This worked as well. Haven't tried using a standmixer so I don't know how it compares.
- Instead of cider vinegar I used red wine vinegar;
- I used bread flour;
- Picking up the dough to let it stretch didn't work well for me, holes appeared pretty much instantly. Instead I stretched the dough while it was lying on the tablecloth by putting my hands underneath and stretching it out further and further;

READY FOR MY DISASTER'S TALE?

My original idea was to talk about apples.
Yes, apples.
Luckily when I was 18th I had my holidays in an enchanting valley called Val di Non the apple valley in Italy in Trentino Alto Adige and here is the english link to the official site
And there I've lived eating apple strudel in every moment of my day...what a smell outside restaurant, bakery, bar everywhere.
This delightful smell and taste was due to the excellent quality of apples so I was a little bit disappointed reading a generic "apple suitable for tart" in Italy this means Mela Renetta.
And although I live in another region it's easy find these apples in our supermarket.
So I've made by hand my dough, rolled the thinnest as possible with only a peripherical little hole and....DISASTER.
As usual I've read too fast all instructions and spread bread crumbs and apple cubes all over the dough sheet without lining them on a border.
And I've exceded with bread crumbles I fear.
My results was awful despite it looks like perfect out of the oven.
The inner filling was dried like sand due to the exceeding bread crumbs and I dreamt about a soft juicy filling as I remembered of that far holidays.
I've tried to put right everything making a warm vanilla sauce.
But it was awful at all.
I'm feeling ashamed thinking on Natalia or Elena aka Comida de Mama one with austriac origins and the other living in Trento.
But I know, they will laugh with me...I hope :)))

domenica 17 maggio 2009

il filo dell'amicizia e un fallo laterale


Che cos'è l'amicizia ai tempi di internet, dei blog, dei forum.
Distanze azzerate, persone che mai avresti conosciuto se non grazie al filo magico, telefonate speciali dai quattro pizzi del continente.
Insomma Internet se ben usato (e va da se...) è per me la più grande finestra sul mondo, il modo per conoscere persone speciali.
Tante, qualcuno potrebbe addirittura pensare che siano troppe.
Per me non son mai troppe, per la mia voglia di relazionarmi con qualcuno, per fare qualche sana risata e per condividere passioni, gioie e anche preoccupazioni.
Insomma la vita corre sul filo, anzi è proprio wireless
E del resto non esisterebbero nemmeno i social network se non fosse per questo continuo allacciare e riallacciare fili relazionali altrimenti impossibili da realizzare.
L'amicizia si nutre della frequenza, anche quella vera.

Della voglia di raccontare e raccontarsi sempre e comunque.
L'amicizia ti salva dalla noia e dal senso di impotenza frammisto a rabbia che prende quando qualcuno ti ferma.
Ti salva dalla mancanza di ispirazione, ti conferma che si se ti ci metti ci sai fare e dai che ti aiuto io.
Insomma da quel che mi sta succedendo in questi giorni.


Che c'entra questo con la torta al cioccolato?
Ma come non l'avete riconosciuta?
Sicuri sicuri? Eddai guardate bene...

Un aiutino forse l'avete vista in origine qui da Marzia aka Adrenalina rimbalzata poi ovunque da Comida o da Alex


E ci si sente meno soli e ancora capaci di qualcosa che non sia rimuginare capaci di alzarsi una mattina e dirsi no, adesso ci riprovo e lo faccio con l'aiuto degli amici.

Che poi questa torta fosse in cima alla mia wishlist è stato solo un aspetto secondario così come le tre ienuzze non abbiano resistito alla tentazione addentandola lateralmente.

vi ricopio la ricetta che trovate in originale da Adrenalina e risponde perfettamente al suo motto, minimo sforzo massimo risultato.

Ingredienti:

300g di cioccolato fondente

200g di zucchero120g di burro

100g di farina

1/2 cucchiaino di lievito per dolci

5 uova

1 cucchiaino scarso di fleur de sel

2 cucchiai di zenzero candito (facoltativo)

Preriscaldate il forno a 160°. Fate fondere il cioccolato a bagnomaria, unite il burro e lasciatelo sciogliere.Mescolate bene: il composto deve risultare liscio ed omogeneo.In una ciotola capiente sbattete (con la frusta elettrica) uova e zucchero sino a che diventeranno quasi bianche, quindi unitevi il cioccolato fuso a filo, sempre mescolando.Unite a poco a poco lievito e farina spolverandoli sul composto con un setaccio mentre continuate a mescolare dall'alto verso il basso. Infine aggiungete lo zenzero tritato. Imburrate uno stampo rettangolare, foderatelo di carta da forno e versatevi il composto a strati, spolverandone ognuno con pizzico di fior di sale.Infornate e cuocete per un 1 ora e 10 minuti o sino a che, infilando uno stecchino nella torta, questo ne risulterà pulito.

domenica 10 maggio 2009

fermo macchine

so che molti di voi si sono accorti della mia latitanza prolungata e so che quasi tutti ne conoscono i motivi.
Si sto aspettando il mio quarto bambino.
No tranquilli non siamo catecumenali, nè metodisti del settimo giorno, non siamo affetti da grave malattia contagiosa nè malati di protagonismo...semplicemente abbiamo e avremo una famiglia numerosa.
quel che mi dispiace enormemente è che molte persone che stimo e per le quali nutro affetto, non tutte per fortuna, considererebbero più sano e naturale comprare una borsa di Gucci da 3000 euro piuttosto che imbarcarsi nell'avventura del quarto figlio.
Poveri loro.
Purtroppo però le circostanze e la mia salute mi costringeranno al letto permanente per molto tempo, non so fino a quando almeno fino a quando qualcuno non ci considererà abbastanza forti da alzarci e ci ridarà il permesso.
Vi saluto ma sappiate che ci sarò lo stesso, nei vostri blog e non sul mio ovviamente.
Se devo dirla proprio tutta tutta il fatto di non poter scrivere mi da un qualche sollievo e mi solleva allo stesso tempo dalla responsabilità verso la mia creatura, che a lungo andare diventa un figlio...adesso ho un figlio in carne ed ossa a cui pensare credo che abbia la priorità assoluta.
Un abbraccio a tutti voi.
Enza

sabato 11 aprile 2009

Ciccio Pasticcio


"Andiamo da Ciccio Pasticcio!", dice Crystal appena sveglia e corre insieme alla sorella a trovare il clown Ciccio Pasticcio nella tendopoli all'Aquila dove per i bambini la vita ancora riserva delle sorprese piacevoli e poco importa a volte basta un pallone o il cappello sghembo di Ciccio Pasticcio appunto.

Ciccio Pasticcio è Nicoletta diolabenedica proprio come l'ormai famosissima Valentina diolabenedica di non solo mamma.
Il primo giorno di lavoro, quasi 4 anni fa, fece fuori un bicchiere e un biberon e mi guardava con tanto d'occhi mentre me la ridevo come una matta vedendola quasi terrorizzata.
"Nicoletta le cose sono fatte per rompersi!".
Ciccio Pasticcio sono io, che quando mi ci metto faccio le cose di un bene ma di un bene che mai diresti che quella magnifica preparazione possa entrare di diritto nella competizione più divertente creata

Il Disaster Award.

Che deve essere perfetto, ingannarti, tirarti un sulenni sfunnapedi come direbbe Salvo Montalbano e poi fregarti alla grande facendoti santìare (eh si ragazzi, i siciliani sono troppo avanti non tirano giù i santi dal calendario, santìano direttamente).
Deve essere la summa di tutto questo, bello fuori e perfido dentro perchè solo così sarà disastrosamente perfetto come la Luisona


bellissima, perfetta, la pasta del secolo con la sua granella in duralluminio.
Wikipediando si trova anche la Palugona che ha il pregevole difetto di formare un fantastico blocco di cemento armato che ostruisce esofago e vie aeree superiori.
Un vero disastro...(però a ben pensarci saprei io a chi far mangiare la Palugona...ma questa è un'altra storia e ci penseranno, si spera, i magistrati)-

Ed è per questo che, presa dal più grande delirio di onnipotenza che il mio superego già per se pompatissimo abbia mai conosciuto e provvista da abbondante quantitativo di lievito madre, mi decido: faccio la pizza di pasqua al formaggio.

Eccola, non è bella? non è perfetta? non sembra quasi di sentirne il profumo?
Passami la sega elettrica e il trapano con la punta del 16, va là.

Ovviamente ne approfitto per fare a tutti gli auguri di Pasqua con una fiammella di speranza accesa nel cuore, per dare un abbraccio sincero a tutti voi e ad Alex in particolare (perdonatemi ma gli amici si vedono nel momento del bisogno, non sentitevi trascurati) alla quale spero di aver strappato una risata.

Scusatemi se non passerò da voi in questi giorni ma per me comincia un lunghissimo we di guardie in ospedale e non ho modo nè tempo, purtroppo.
Vi lascio con un paio di foto dal mio archivio.
Quelle si che erano cosine buone buone, su quelle non garantisce Ciccio Pasticcio, garantisco io.

I conchiglioni del pranzo di Pasqua


lunedì 6 aprile 2009

un lungo silenzio triste

No.
Niente ricette, niente risate, niente ironia.
Questa notte io, figlia del terremoto dell'umbria del 97, ho rivissuto gli stessi secondi di terrore e ho subito capito che da qualche altra parte si stava consumando un'incredibile tragedia.

Non ci sono parole per commentare quello che sta accadendo in queste ore, solo tristezza, sgomento e paura che possa succedere di nuovo chissà dove.

Nei prossimi giorni cercherò il banner del sostegno umanitario e lo troverete sulla mia sidebar.

Per adesso silenzio e rispetto.

divulgo da francescaV

Copiate e diffondete questi numeri, grazie:

Per volontari addestrati: 3270499293.

Per viveri, coperte, medicinale o altro: 800.860.146 oppure 06.68208.

Chiunque avesse una struttura alberghiera in Abruzzo in grado di ospitare: 0854308309.

divulgo da MuVaRa

Per donazioni:

Raccolta fondi Croce Rossa Italiana:

Conto corrente bancario C/C n. 218020 presso BNL - roma, intestato a CRI, codice Iban IT66 - C010 0503 3820 0000 0218020,
causale: pro terremoto Abruzzo;

Conto corrente postale n. 300004 intestato a CRI
causale: pro terremoto Abruzzo;

Versamenti on line sul sito: http://www.blogger.com/www.cri.it/donazioni.html

informazioni utili da http://www.repubblica.it/

http://kataweb-ilcaso.temi.kataweb.it/2009/04/06/terremoto-in-abruzzo-informazioni-utili/

una delle tante sottoscrizioni

http://ilcentro.gelocal.it/dettaglio/il-centro-lancia-una-sottoscrizione-per-aiutare-i-terremotati/1614669?edizione=EdRegionale

domenica 5 aprile 2009

sono in ritardo sono in ritardo.


Si proprio come il Bianconiglio.
Sono in ritardo corro come una forsennata e il mio blog langue inesorabilmente.
Però tralasciarlo è come tralasciare una specie di figlio, si viene sommersi dai sensi di colpa.
Così ci si ritrova alle 6 del mattino a scartabellare l'archivio fotografico della roba da mangiare in cerca di ispirazione.
Seeee, mica facile, alle 6 del mattino direte voi.
Sarà, ma questo è il mio unico momento della giornata in cui letteralmente posso occuparmi dei cosidetti affari miei.
E a proposito di meraviglie ne approfitto per segnalare il pdf di febbraio de la cucina di calycanthus, leggetelo tutto ne vale davvero la pena.
Tanto lo so che chi non conosce i calicanthi ne sarà talmente conquistato da leggerli fino a mettersi in pari con gli arretrati.
Ok il mio minuto di ora d'aria è già terminato.
Vi lascio questo, perfetto per la colazione della domenica.
La ricetta l'ho liberamente interpretata dal bellissimo blog di Paoletta di cui mi avevano attratto le foto (e quando mai) integrando con quello di Silvye di amouses bouche poi se proprio vi va di farlo strano allora ecco qui ci pensa la mercante di spezie ad accontentarvi.
Il liberamente, ci tengo a precisare, non riguarda la lista degli ingredienti quanto le pieghe nel senso che ormai la mia abitudine alle pieghe è tale e tanta che non leggo nemmeno.
In questo caso le pieghe sono state 5 fatte sempre nel solito modo piegando la sfoglia in 3.
Insomma siccome ci tengo che vi vengano bene e siccome non saprei come spiegarvi come le piego sarà meglio rivolgersi per la tecnica di piegatura alle maestre di cui sopra-
In questo modo mi piacerebbe partecipare alla raccolta di Trattoria MuVaRa anch'essa da me disertata per troppo tempo e lo faccio citando ben 3 blog, quando si fa una cosa va sempre fatta bene, non credete?

Buona domenica (delle palme)
Ingredienti:
-250 g farina 0
-150 ml di latte intero
-30 g di zucchero
-5 gr di lievito di birra.
-1 cucchiaino scarso di sale
-110 g di burro
-1 tuorlo

Impastare tutti gli ingredieni elencati, tranne il burro che servirà per la sfogliatura, fino ad ottenere una pasta omogenea.
Avvolgere la pasta nella pellicola e metterla tutta la notte in frigo.
Una volta trascorso il tempo del riposo in frigo stendere la pasta in un rettangolo spesso circa 1 cm e mettervi al centro il burro freddo coprire con i due lembi di pasta e sigillare la pasta con la pressione delle dita avendo cura di far fuoriuscire tutta l'aria.
Da qui in poi vi invito a guardare la bellissima sequenza fotografica di Paoletta.
Io non avrei potuto far lo stesso e non a causa del mio affollatissimo entourage familiare.

Vi dico soltanto che sono finiti in un attimo.
BUON COMPLEANNO MUVARA

venerdì 27 marzo 2009

March DB: Wake up! it's lasagne time!


The March 2009 challenge is hosted by Mary of Beans and Caviar, Melinda of Melbourne Larder and Enza of Io Da Grande. They have chosen Lasagne of Emilia-Romagna from The Splendid Table by Lynne Rossetto Kasper as the challenge.

All recipes below from The Splendid Table: Recipes from Emilia-Romagna, the Heartland of Northern Italian Food by Lynne Rossetto Kasper (published by William Morrow and Company Inc., 1992).
Lasagne of Emilia-Romagna (Lasagne Verdi al Forno)
(Serves 8 to 10 as a first course, 6 to 8 as a main dish)
Preparation Time: 15 minutes to assemble and 40 minutes cooking time
10 quarts (9 litres) salted water
1 recipe Spinach Pasta cut for lasagna (recipe follows) #1
1 recipe Bechamel Sauce (recipe follows)#21 recipe Country Style Ragu (recipe follows) #3
1 cup (4 ounces/125g) freshly grated Parmigiano-Reggiano

Method Working Ahead: The ragu and the béchamel sauce can be made up to three days ahead. The ragu can also be frozen for up to one month.

The pasta can be rolled out, cut and dried up to 24 hours before cooking.
The assembled lasagne can wait at room temperature (20 degrees Celsius/68 degrees Fahrenheit) about 1 hour before baking. Do not refrigerate it before baking, as the topping of béchamel and cheese will overcook by the time the center is hot.

Assembling the Ingredients:
Have all the sauces, rewarmed gently over a medium heat, and the pasta at hand.
Have a large perforated skimmer and a large bowl of cold water next to the stove.
Spread a double thickness of paper towels over a large counter space.
Preheat the oven to 350 degrees Fahrenheit (180 degrees Celsius).
Oil or butter a 3 quart (approx 3 litre) shallow baking dish.

Cooking the Pasta:
Bring the salted water to a boil.
Drop about four pieces of pasta in the water at a time.
Cook about 2 minutes.
If you are using dried pasta, cook about 4 minutes, taste, and cook longer if necessary.
The pasta will continue cooking during baking, so make sure it is only barely tender.
Lift the lasagne from the water with a skimmer, drain, and then slip into the bowl of cold water to stop cooking.
When cool, lift out and dry on the paper towels.
Repeat until all the pasta is cooked.

Assembling the Lasagne:
Spread a thin layer of béchamel over the bottom of the baking dish.
Arrange a layer of about four overlapping sheets of pasta over the béchamel.
Spread a thin layer of béchamel (about 3 or 4 spoonfuls) over the pasta, and then an equally thin layer of the ragu.
Sprinkle with about 1&1/2 tablespoons of the béchamel and about 1/3 cup of the cheese.
Repeat the layers until all ingredients are used, finishing with béchamel sauce and topping with a generous dusting of cheese.

Baking and Serving the Lasagne:
Cover the baking dish lightly with foil, taking care not to let it touch the top of the lasagne.
Bake 40 minutes, or until almost heated through. Remove the foil and bake another 10 minutes, or until hot in the center (test by inserting a knife – if it comes out very warm, the dish is ready). Take care not to brown the cheese topping. It should be melted, creamy looking and barely tinged with a little gold.
Turn off the oven, leave the door ajar and let the lasagne rest for about 10 minutes.
Then serve. This is not a solid lasagne, but a moist one that slips a bit when it is cut and served.

#1 Spinach Egg Pasta (Pasta Verde)
Preparation: 45 minutes

Makes enough for 6 to 8 first course servings or 4 to 6 main course servings, equivalent to 1 pound (450g) dried boxed pasta.
2 jumbo eggs (2 ounces/60g or more)
10 ounces (300g) fresh spinach, rinsed dry, and finely chopped;
or 6 ounces (170g) frozen chopped spinach, defrosted and squeezed dry
3 1/2 cups (14 ounces/400g) all purpose unbleached (plain) flour (organic stone ground preferred)

Working by Hand:
Equipment
A roomy work surface, 24 to 30 inches deep by 30 to 36 inches (60cm to 77cm deep by 60cm to 92cm). Any smooth surface will do, but marble cools dough slightly, making it less flexible than desired.
A pastry scraper and a small wooden spoon for blending the dough.
A wooden dowel-style rolling pin.
In Italy, pasta makers use one about 35 inches long and 2 inches thick (89cm long and 5cm thick).
The shorter American-style pin with handles at either end can be used, but the longer it is, the easier it is to roll the pasta.

Note: although it is not traditional, Enza has successfully made pasta with a marble rolling pin, and this can be substituted for the wooden pin, if you have one.

Plastic wrap to wrap the resting dough and to cover rolled-out pasta waiting to be filled. It protects the pasta from drying out too quickly.
A sharp chef’s knife for cutting pasta sheets.
Cloth-covered chair backs, broom handles, or specially designed pasta racks found in cookware shops for draping the pasta.

Mixing the dough:
Mound the flour in the center of your work surface and make a well in the middle.
Add the eggs and spinach.
Use a wooden spoon to beat together the eggs and spinach.
Then gradually start incorporating shallow scrapings of flour from the sides of the well into the liquid.
As you work more and more flour into the liquid, the well’s sides may collapse.
Use a pastry scraper to keep the liquids from running off and to incorporate the last bits of flour into the dough. Don’t worry if it looks like a hopelessly rough and messy lump.
Kneading:
With the aid of the scraper to scoop up unruly pieces, start kneading the dough.
Once it becomes a cohesive mass, use the scraper to remove any bits of hard flour on the work surface – these will make the dough lumpy.
Knead the dough for about 3 minutes. Its consistency should be elastic and a little sticky.
If it is too sticky to move easily, knead in a few more tablespoons of flour.
Continue kneading about 10 minutes, or until the dough has become satiny, smooth, and very elastic.
It will feel alive under your hands.
Do not shortcut this step.
Wrap the dough in plastic wrap, and let it relax at room temperature 30 minutes to 3 hours.
Stretching and Thinning:
If using an extra-long rolling pin work with half the dough at a time. With a regular-length rolling pin, roll out a quarter of the dough at a time and keep the rest of the dough wrapped.
Lightly sprinkle a large work surface with flour.
The idea is to stretch the dough rather than press down and push it.
Shape it into a ball and begin rolling out to form a circle, frequently turning the disc of dough a quarter turn.
As it thins outs, start rolling the disc back on the pin a quarter of the way toward the center and stretching it gently sideways by running the palms of your hands over the rolled-up dough from the center of the pin outward.
Unroll, turn the disc a quarter turn, and repeat. Do twice more.
Stretch and even out the center of the disc by rolling the dough a quarter of the way back on the pin.
Then gently push the rolling pin away from you with one hand while holding the sheet in place on the work surface with the other hand. Repeat three more times, turning the dough a quarter turn each time.
Repeat the two processes as the disc becomes larger and thinner.
The goal is a sheet of even thickness.
For lasagne, the sheet should be so thin that you can clearly see your hand through it and see colours.
Cut into rectangles about 4 by 8 inches (10 x 20 cm).
Note:
Enza says that transparency is a crucial element of lasagne pasta and the dough should be rolled as thinly as possible. She says this is why her housekeeper has such strong arms!
Dry the pasta at room temperature and store in a sealed container or bag.
#2 Bechamel
Preparation Time: 15 minutes
4 tablespoons (2 ounces/60g) unsalted butter
4 tablespoons (2 ounces/60g) all purpose unbleached (plain) flour, organic stone ground preferred
2 2/3 cups (approx 570ml) milk
Salt and freshly ground pepper to taste
Freshly grated nutmeg to taste

Using a medium-sized saucepan, melt the butter over low to medium heat.
Sift over the flour, whisk until smooth, and then stir (without stopping) for about 3 minutes. Whisk in the milk a little at a time and keep the mixture smooth.
ring to a slow simmer, and stir 3 to 4 minutes, or until the sauce thickens.
Cook, stirring, for about 5 minutes, until the sauce thickens. Season with salt, pepper, and a hint of nutmeg.

#3 Country Style Ragu’ (Ragu alla Contadina)
Preparation Time: Ingredient Preparation Time 30 minutes and Cooking time 2 hours

Makes enough sauce for 1 recipe fresh pasta or 1 pound/450g dried pasta)

3 tablespoons extra virgin olive oil (45 mL)
2 ounces/60g pancetta, finely chopped
1 medium onion, minced
1 medium stalk celery with leaves, minced
1 small carrot, minced
4 ounces/125g boneless veal shoulder or round
4 ounces/125g pork loin, trimmed of fat, or
4 ounces/125g mild Italian sausage (made without fennel)
8 ounces/250g beef skirt steak, hanging tender, or boneless chuck blade or chuck center cut (in order of preference)
1 ounce/30g thinly sliced Prosciutto di Parma
2/3 cup (5 ounces/160ml) dry red wine
1 1/2 cups (12 ounces/375ml) chicken or beef stock (homemade if possible)
2 cups (16 ounces/500ml) milk
3 canned plum tomatoes, drained
Salt and freshly ground black pepper to taste

Working Ahead:The ragu can be made 3 days ahead. Cover and refrigerate. It also freezes well for up to 1 month. Skim the fat from the ragu’ before using it.
Browning the Ragu Base:Heat the olive oil in a 12 inch (30cm) skillet (frying pan) over medium-high heat.
Have a large saucepan handy to use once browning is complete. Add the pancetta and minced vegetables and sauté, stirring frequently with a wooden spoon, 10 minutes, or until the onions barely begin to color. Coarsely grind all the meats together, including the prosciutto, in a food processor or meat grinder. Stir into the pan and slowly brown over medium heat.

First the meats will give off a liquid and turn dull grey but, as the liquid evaporates, browning will begin.
Stir often, scooping under the meats with the wooden spatula. Protect the brown glaze forming on the bottom of the pan by turning the heat down. Cook 15 minutes, or until the meats are a deep brown.
Turn the contents of the skillet into a strainer and shake out the fat. Turn them into the saucepan and set over medium heat.
Reducing and Simmering: Add the wine to the skillet, lowering the heat so the sauce bubbles quietly. Stir occasionally until the wine has reduced by half, about 3 minutes. Scrape up the brown glaze as the wine bubbles. Then pour the reduced wine into the saucepan and set the skillet aside.
Stir ½ cup stock into the saucepan and let it bubble slowly, 10 minutes, or until totally evaporated.

Repeat with another ½ cup stock. Stir in the last 1/2 cup stock along with the milk. Adjust heat so the liquid bubbles very slowly. Partially cover the pot, and cook 1 hour. Stir frequently to check for sticking.
Add the tomatoes, crushing them as they go into the pot. Cook uncovered, at a very slow bubble for another 45 minutes, or until the sauce resembles a thick, meaty stew. Season with salt and pepper.

Alternative Recipes from Mary of Beans and Caviar
#1 Gluten Free Egg Pasta
The choice of the first flour is personal. I used corn flour because the subtle taste blended well with the dish. However, this is a matter of personal taste – please feel free to substitute a different flour for the corn flour but don't subsititute a starch.

150 gr corn flour or masa in North America - yellow with a slightly gritty feel (250 mL, 1 cup) NOT a starch 100 gr corn starch* (3/4 cup, 187.5 mL)
100 gr tapioca flour* (225 mL, 9/10 cup or a little over 7 volume ounces)
150 gr of potato starch* (250 mL, 1 cup)
100 gr of glutinous rice flour* (200 mL, ¾ cup)
10 gr of Xanthan powder (1.5 tsp, 7.5 mL)10 gr of salt (1 tsp, 5 mL)
6 extra large eggs (60 gr each or 2.5 oz in weight, 1 fluid oz in volume)
3/8 cup of water (95 mL)
50 mL of extra virgin olive oil (1/5 cup)

Note: If you add cooked chopped spinach to this recipe, you may have to reduce the water.

The recipe was not tested (yet) with the addition of spinach.
*fine white powder that squeaks when rubbed between fingers
Plastic wrap or parchment paper for your work surfaceAluminium foil to cover the lasagne
Sift all the dry ingredients together in a large bowl. Make a well in the middle of the dry ingredients.
Whisk together 3 eggs, the water and/or spinach, and the oil.
Pour into the middle of the dry ingredients.
Mix with a sturdy wooden spoon, gradually drawing more of the flour mix into the wet ingredients. Add each egg as needed.
The dough will be crumbly at the beginning but will gradually come together as you add the eggs. You will need to use your hands to squeeze and mix the dough.
The dough will be firm and stick together when ready. It will not have the elasticity of gluten dough therefore it will crack when kneaded and pushed. Form it into a smooth ball, oil it lightly, and cover securely with plastic wrap. Let it rest for an hour.
Put a sheet of plastic wrap on your work surface.
This is very important as the dough will not hold together very well when lifted. Have flour ready for dusting (corn flour etc) and dust the surface lightly.
Cut a piece of dough about the size of really large egg – it doesn’t matter the size but start small for the first one to gauge how much space you need. Keep the remaining dough covered so it does not dry.
Roll the dough into a ball and flatten into a disc with your hands.
Put it on your work surface and flatten with your hands.
Use a rolling pin and gently push the dough down and out ward from the centre. You may have to place one hand on the plastic wrap as you push the dough down and away.
Gluten free dough does not stretch like wheat dough therefore it needs gentle flattening and pushing. If it breaks, pat it back together. If it is too dry, dab a little water with your finger.
The gluten free dough will be thicker than wheat dough and you will barely be able to see your hand through the dough.
Once it is flattened, cut into strips or squares that will fit your pan.
Set the dough aside on the plastic sheet.

There is no need to dry the dough. But if you do dry the dough, it will not be able to hang because it will break. Stack the rolled out dough with plastic sheets in between.
Stack the sheets when dry and wrap securely.
Store in the fridge until ready to use.
Freezing will make the dough crumbly and difficult to work with – so freeze only as a last resort!
This dough does not need to be precooked before being assembled into the lasagne.

#2 Gluten Free Béchamel - White Sauce
2 & 2/3 cup milk
4 tablespoons unsalted butter or Extra virgin olive oil
4 tablespoons corn starch (fine white and squeaky) – another starch can be substituted
Salt and pepper to taste
Freshly grated nutmeg

Mix the corn starch with ½ cup of cold milk.
Heat the rest of the milk in a small sauce pan until steaming but do not boil.
Add the milk/cornstarch mixture to the steaming milk.
Stirring constantly, raise the heat and heat the mixture until thick. Once it is thick, remove it from the heat and add the butter, salt, pepper and nutmeg.
Taste and adjust the seasonings. Have the béchamel warm or at room temperature ready to assemble the lasagne. Whisk the sauce occasionally if it becomes stiff or thick.

Assembling the Gluten Free Lasagne
The assembly is the same as the regular lasagne with the addition of water. Gluten free lasagne noodles need a little more moisture for the lasagne, so you will be adding a little bit of water to the lasagne.

Before assembly, pour plain water into the pan, enough to form a thin film of water over the bottom. A 9 x 13 inch or 25 x 33 cm pan required almost ½ cup (125 mL) of water. Once the lasagne is assembled, pour a tablespoon or 15 mL of water into each corner of the dish. Cover the lasagne tightly with aluminium foil. Be careful not to touch the top of the lasagne with the foil. Bake as directed.
This lasagne was baked in a glass baking dish. Adjustments in time and temperature may be needed if your dish is metal!


And know are you ready for my sentimental and traditional two cents?

When Mary of Beans and Caviar emailed me and explained her crazy idea, I didn't know so much on her.
Only a canadian woman, anything else? No, anything else.
But I was so attracted from this lady and her brilliant email.

And two times glad to welcome Melinda of Melbourne larder and her last daughter, born under the DB sign!
We had work hard and laugh and feel toghether althought the huge distance.
As I said to my DB mates, I'll waiting for you all in Italy, in Rome, in Sicily wherever you want.

I love you both,
Enza
OK those were sentimental ones and now let's make show!
As Italian it was so difficult assess what to do or not in this challenge.
One of the most stressed point from all of us was that
LASAGNE AREN'T A BOX IN WHICH PUT EVERYTHING!
AND WE RECCOMENDED BE LIGHT LIGHT LIGHT WITH SAUCE AND TOPPING
The others...Doing dough, of course...like I've made by hand like an Italian raszdora.
This is a term used for housekeeper of Emilia Romagna but there's much more in this there's a mother, a wife, a splendid female cook, the real institution for the family.
So I've tried to emulated this splendid example and although I haven't arms strong enough I've started (and I didn't forget that I have a mother\raszdora).
And for this shots I have two tips.

1. if your dough is hard to knead, add some olive oil (like my mother said me)
or 3 tbs can be enogh

2. when the dough is really ready? when pressed with a fingertip it turns back quickly

3. When you're tired and you have a fantastic noodle machine like me, please use it!!
(one of the most appreciated wedding gift I had)


Lasagne above were traditional as explained in the recipe.
But this is my once in my life challenge and this is an italian one.
So go ahead, Enza.
Here in Italy springtime is entering, slowly but is almost in.
And spring is artichokes is asparagus is freshness and herbs, do you agree?
So as follows I made an asparagus lasagna simply chopping finely like a vegetables ragout some asparagi and quickly sirred in extra virgin olive oil and out of the flame sprinckled with some ciboulette and fresh herbs directly from my roof garden.
Mix bechamel and asparagus ragout, season with salt and pepper and using parmesan


And now a traditional lasagna dish coming from Liguria, one of the region I adore.
As many of us knows, Liguria is the motherland of Pesto.
Basil, garlic, olive oil, pinewoods and parmesan and sardinia's pecorino.

Nooo, pesto is much more.
If you'd like to taste the real pesto you MUST come in Italy, being hosted from a ligurian family and then you can say "I know what pesto is!".
Because the pesto requires only basilico from Pra, local pinewoods and the world-beating extravirgin olive oil from taggiasche olives and all ingredients must be beat in a marble vase so called "mortaio".
And, often pasta will be cooked toghether with some potatoes and green beans finely chopped as shown.
But, unfortunately, I'm not from Liguria and I hadn't enough time to use my mortaio...so apologize me, I've used the mixer and here is my tip.

1. Put mixer's blade in the freezer before make pesto.
in this way basil leaves won't turn into a dark colour.

In this case I didn't use parmesan cheese but another Italian cheese (as people from liguria knows) called "crescenza" a soft, creamy and fresh cheese very smooth and delicate in taste.


And as final challenge something really new for me althought in the centre of my country there's this strange habit to taste a sort of sweet pasta noodles seasoned with sugar, cocoa, nuts, pecan and rhum.

In this case I thought about the consistency and use a round pasta to assemble my sweet lasagna.

I've deep pan fried some of these pasta circles and use the other one not fried to assemble a lasagna ready for the oven.

I've made at the same time a sweet bechamel sauce using the same dose of the savoury one, adding to the hot milk some sugar (about 3 tbs in 350 ml) and melting tabout 70 gr of dark chocolate.
My pasta for sweet lasagna was boiled in a sugar\water\lemon zests solution instead of the salted water.

I've divided the sauce into two parts, in one of this parts I added an egg and wisk quickly, anything in the other one

So I've assembled the fried pasta circle spreading some simple chocolate bechamel (part without egg) and then sprinkle some candied ginger completing the surface spreading some almonds.


For the other one (part with the egg) I've assembled in a ring-a-tarte pasta, chocolate bechamel, almonds finishing with some withe sweet bechamel and almonds.